Conference Attendance
UIST 2021 is committed to providing an inclusive environment for the virtual conference and we will do our best to accommodate requests for special assistance.
Are the Conference Technologies Accessible?
UIST 2021 will be using the following technologies: Zoom, Discord, Ohyay and programs.sigchi.org.
When using Zoom, we encourage you to turn on video to help lip-reading (a virtual background can be used for privacy). Zoom supports a range of keyboard shortcuts, supports screen reader alerts, and automatic live captioning. Please see the following page for more information about Zoom’s accessibility support: https://zoom.us/accessibility.
We have evaluated Discord with one screen reader user and found that it was not a perfectly accessible experience. We have not evaluated its accessibility for people with other types of impairments. If you experience an accessibility problem on the UIST Discord please reach out to the accessibility chairs <accessibility2021@uist.org>.
We specify ARIA labels, custom tabindex, and custom access keys for elements in rooms of Ohyay, so users can navigate everything with the keyboard. More information about Ohyay’s accessibility support: https://docs.ohyay.co/docs/accessibility.
We also provide introductory video tours of Discord and Ohyay for screen reader users.
Will Sign Language Interpretation and Captions Be Available?
American Sign Language (ASL) interpreting will be provided by Hands in Motion (https://himservice.com) and Communication Access Real-time Transcription (CART) by Caption First (https://captionfirst.com). We will support ASL for Keynotes, and CART for Keynotes and Papers.
We didn’t receive other individual requests of the services. For Ask-Me-Anything sessions on Zoom we will enable its auto captioning feature; There is no automated solution for captions built into ohyay. If you want automated captions, you could use Chrome’s built-in captions. See https://blog.google/products/chrome/live-caption-chrome/.
Who Should I Contact if I Have an Access Problem During the Event?
We will provide the accessibility support channel in Discord during the conference. At least one member of Accessibility Chairs or Student Volunteers will be there to support you with accessibility needs or answer you with accessibility related questions. You may also contact the accessibility chairs in advance for private backchannel contact information. The Accessibility Chairs for UIST 2021 are Ruolin Wang, Amanda Swearngin and Dhruv Jain. You can contact them directly at any time by emailing <accessibility2021@uist.org>.
Making PDF accessible
We strongly encourage you to add accessibility to the PDF using Acrobat Pro DC and the steps below. If you do not have access to Acrobat Pro, and you need assistance with accessibility, please contact the UIST 2021 Accessibility Chairs at accessibility2021@uist.org.
'Undo' is not well supported in Acrobat Pro, so save often!
- Set tab order. Setting the tab order is necessary so that a keyboard user can use the tab key to navigate through the document.
- Select the Page Thumbnails icon on the left to show thumbnail images for each page (or, in the 'View' menu, select 'Show/Hide > Navigation Panes > Page Thumbnails').

- Select all pages with Control-A (Windows) or Command-A (Mac).
- Right-click and select 'Page Properties'.
- In the popup window, select 'Use Document Structure' on the 'Tab Order' tab.
- Click ‘OK’.
- Open the accessibility tools.
- From the View menu, select Tools > Accessibility.
- The accessibility tools panel opens on the right of the screen.

- Add document tags. The PDF file must be "tagged" with metadata about the document structure and text. For a small minority of pdfs, adding tags may cause visual elements to move or disappear.
- Save the document in case adding tags introduces visual issues.
- Select 'Autotag Document' from the accessibility tools panel.
- An 'Add Tags Report' will appear on the left when tagging has been completed.
- Important: Visually scan the entire paper to make sure the visual appearance has not changed. If items have moved or disappeared, stop here and contact the accessibility chairs for help.
- Check tagging.
- Select 'Reading order' from the accessibility tools panel.
- The Reading Order panel appears, and the paper is visually marked up to show the content detected on each page and the order it will be read.

-
Skim through the pages of the paper.
- Make sure the reading order of the text is correct. If it’s not, you can use the reading order tool to identify the text, and the order panel to reorder the items on each page.
- Mark the paper title as 'Heading 1', main headings as 'Heading 2', second level headings as 'Heading 3', and so on.
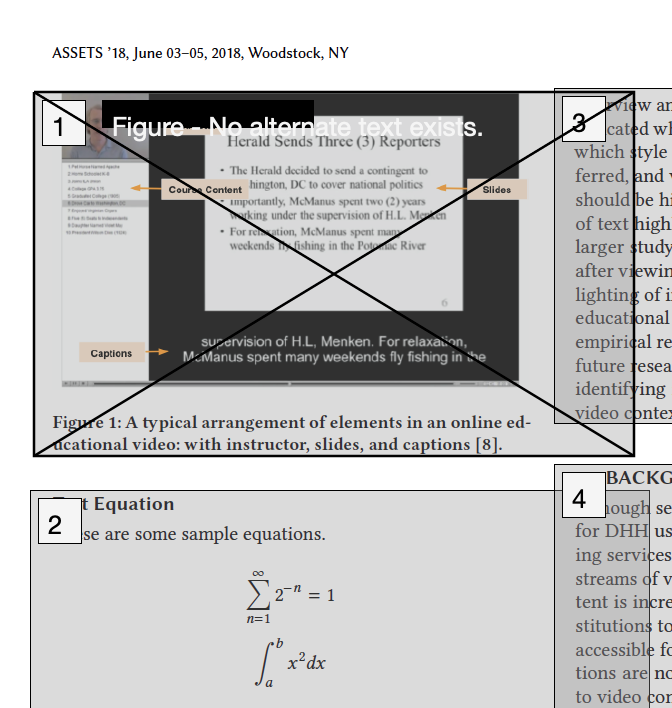
- Make sure all the figures have been marked as figures. If the caption is not included in the figure, drag over the figure and the caption and use the 'Figure/Caption' option in the 'Reading Order' panel. If the marked figure includes non-figure content, as in the example above, select the extra content and mark it as text/formula/table/etc using the options on the 'Reading Order' panel. In the example above, after marking the text in this way, the border of the figure is updated.Updated page markup for figure differs from the previous screenshot in that the text below the figure is no longer within the figure's border.
- The border of the figure may appear larger than the figure itself. This is fine so long as the other items on the page are marked appropriately, as with the second column of text in the example.
- Make sure all tables are identified as tables. See Step 7 below for more details on proper table markup.


- Close the 'Reading Order' panel.
- Add figure descriptions (alternative text) to all figures. The alt-text should contain the equivalent information to the image itself, so that the content is accessible to readers and reviewers who cannot see the image. It should not be the same as captions, which provide additional information to the image but do not supplement it.
- Select "Set Alternate Text" from the accessibility tools panel. This option will walk you through each image detected in the paper and ask you to provide alternative text.
- If the highlighted figure is actually a running header or footer, or anything else that isn’t an actual figure, glyph or meaningful image in the paper, click the 'Decorative figure' checkbox. CHECK THE CONTENT DID NOT DISAPPEAR!
- If the highlighted figure is a real figure, copy the description from your source into the 'Alternate text' field. See the SIGACCESS Guide to Describing Figures for details on how to write good figure descriptions.
- After working through all the figures, select 'Save & Close'.
- Mark up tables. For every table in the paper, follow these steps:
- Right-click on the table and select 'Table Editor' from the context menu. If there is no 'Table Editor' option, then open up the 'Reading Order' accessibility tool. Make sure the table is marked up as a table, then select the table and choose 'Table Editor' in the 'Reading Order' tool.
- If you see the message 'Unknown table structure encountered', then your table has not been properly tagged. This happens most often for tables without visible lines separating the cells, or more complex tables.

- Fixing table tagging takes time and a willingness to dig into the tag structure, where there is no way to undo mistakes. The tagging can be manually corrected by using the 'Reading Order' tool to mark up each individual cell, then using the Tags panel to build these table cells into a properly structured table. Refer to Adobe's guidance on table repair for more information.
- If the table is properly tagged, make sure that the header cells are marked as 'TH' and the data cells are marked as 'TD'. The type of a cell can be changed by editing the properties for that cell, available in the context menu. If the cell is a header cell, indicate the scope – whether it is a header for the row, column, or both.

- Set title and language. Select File > Properties from the menu. Select the Description tab. Fill the Title field with the document title. Next, select the Initial View tab. In the Show dropdown, select Document Title. Next, select the Advanced tab. In the Reading Options section, select English from the Language dropdown menu.
- Check accessibility. Run the accessibility checker to see if there are further accessibility issues in your document. Select 'Full Check' from the accessibility tools panel. The checker produces a report that provides help with fixing many accessibility problems. Saving the PDF in Acrobat should save the relevant accessibility data by default. No extra steps are necessary.
Accessibility Chairs
Questions? Contact: accessibility2021@uist.org